| DEVICE | WHIPcreamer INOX | WHIPcreamer STYLE |
|---|---|---|
| Filling volume: | 0,5 L1,0 L | 0,25 L0,5 L |
| Operating pressure (PS): | 20 bar (0,5 L)30 bar (1,0 L) | 20 bar (0,25 L, 0,5 L) |
| Permitted temperature range: | +1 °C to 70 °C (0,5 L, 1,0 L) | +1 °C to 30 °C (0,25 L, 0,5 L) |
| Suitable intended uses | ||
| Household: | yes (0,5 L, 1,0 L) | yes (0,25 L, 0,5 L) |
| Commercial sector: | yes (0,5 L, 1,0 L) | no (0,25 L, 0,5 L) |
| Permitted ingredients | ||
| Cream and similar products: | yes (0,5 L, 1,0 L) | yes (0,25 L, 0,5 L) |
| Other foodstuffs: | yes (0,5 L, 1,0 L) | no (0,25 L, 0,5 L) |
| Cleaning | ||
| Hand wash: | yes (0,5 L, 1,0 L) | yes (0,25 L, 0,5 L) |
| Dishwasher: | yes (0,5 L, 1,0 L) | no (0,25 L, 0,5 L) |
| Maximum permitted number of Kayser chargers: | 1 (0,5 L)2 (1,0 L) | 1 (0,25 L, 0,5 L) |
| SPARE PARTS | WHIPcreamer INOX | WHIPcreamer STYLE |
|---|---|---|
| SPARE PARTS | ||
| Nozzle adapter: | K515A | K514A |
| Decorating nozzle | K515B | K514B |
| Decorating nozzle tulip: | K515C | K514C |
| Charger holder: | K799 | K899 |
| Dust cap: | K735 | K712 |
| Device piston: | K513i | K513A |
| Head gasket: | K750 | K750 |
| Cleaning brush: | K737 | K737 |
|
| |||||||
Cream whippers are pressurised containers for which special safety precautions apply.
1. Please read the entire operating instructions carefully.
2. Keep these instructions safely for future use.
3. The WHIPcreamer is intended solely for the applications specified in these operating instructions (see Table 1.1).
4. The WHIPcreamer is operated under pressure. The maximum permitted operating pressure PS is indicated on the base of the bottle and in Table 1.1. Improper use may result in injury. Please refer to Table 1.1 for suitable intended use and ingredients.
5. Liquefied gases may never be added as an ingredient in the bottle. This is the only way to prevent blockage or a sudden pressure increase and to guarantee safe operation.
6. Please refer to Table 1.1 for information concerning the maximum permitted number of chargers, filling volume and temperature range.
7. Incorrect operation, over-filling of the WHIPcreamer, use of more chargers than specified and/or exceeding of the temperature will cause overpressure in the WHIPcreamer. For this reason the bottle is fitted with a safety base which is curved inwards. In the event the safety base bends outwards, please follow the instructions in section “9. Pressure relief” and contact the company Kayser. Under no circumstances may the WHIPcreamer be used again.
8. The device head is fitted with a pressure limiting device, which is located in the metallic threaded connection.
9. The WHIPcreamer may no longer be used if it is cracked or deformed.
10. Never drop the WHIPcreamer, neither when pressurised nor depressurised. A WHIPcreamer that has been dropped may no longer be used.
11. Do not use a damaged WHIPcreamer or damaged parts.
12. Only original Kayser spare parts and components may be used.
13. Kayser device components may only be used with the corresponding parts of the same device type. The Kayser lettering is featured on the base of the bottle and on the charger holder. The use of third-party parts is hazardous and therefore not permitted!
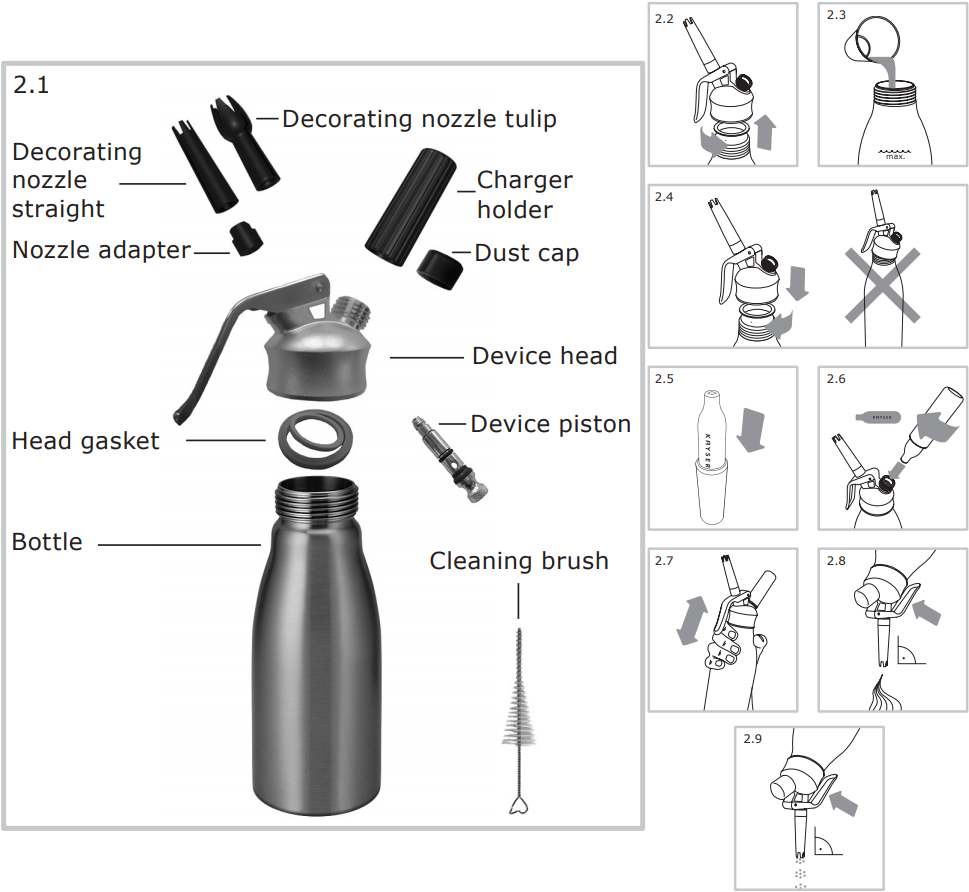
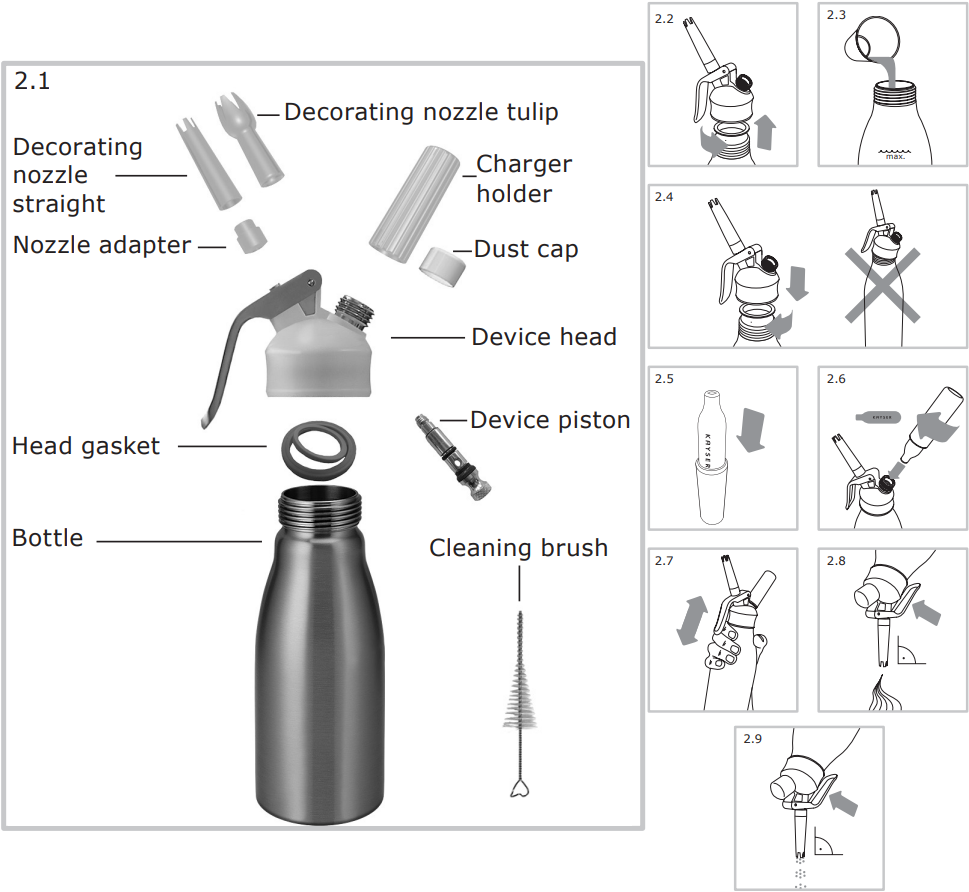
14. Never disassemble into more parts than specified (see image 2.1). Any unauthorised manipulation which exceeds the instructions provided in these operating instructions can be hazardous and will void both the warranty as well as exclude our liability!
15. Please contact the company Kayser for any necessary spare parts (Table 1.2).
16. Never use other media than Kayser cream chargers to pressurise the WHIPcreamer.
17. Thoroughly clean the device before each new filling (see section “5. Cleaning”) – always disassemble it into the specified parts (see image 2.1) and clean these individually. Device heads made of plastic and bottles made of aluminium must never be cleaned in a dishwasher.
18. Check that the WHIPcreamer is not blocked before every use by carefully pressing the lever. (In the event of a blockage please refer to the section “8. Troubleshooting”.)
19. Never force the pressurised WHIPcreamer open. If the device head cannot be easily unscrewed, follow the instructions for pressure relief in section “9. Pressure relief”.
20. Never force the device head of the WHIPcreamer open. If the device head cannot be easily unscrewed, follow the instructions for pressure relief in section “9. Pressure relief”. Should this not solve the problem, please contact the company Kayser.
21. Do not store the filled WHIPcreamer horizontally in order to prevent a blockage.
22.Store the WHIPcreamer and the corresponding Kayser cream chargers out of the reach of children!
23. Only use the WHIPcreamer within the permitted temperature range (see Table 1.1) and do not expose it to direct sunlight. Immediately cool and empty the device in the event of the temperature being exceeded and follow the instructions in section “9. Pressure relief”. The WHIPcreamer may no longer be used after the temperature has been exceeded.
24. Never use more than the maximum permitted number of Kayser cream chargers, see base of the bottle or Table 1.1.
25. Never fill the WHIPcreamer with a volume above that indicated in Table 1.1.
26. Never use ingredients other than those indicated in Table 1.1.
Intended use: The WHIPcreamer is to be used for the whipping of the ingredients specified in Table 1.1. Please follow the operating instructions exactly:
1. Unscrew the device head (image 2.2). Clean the WHIPcreamer before every use as described in section “5. Cleaning”. Then reassemble the device head by inserting the device piston in the designated opening, screw on the nozzle adapter and the decorating nozzle and place the head gasket into the device head – all parts are described in image 2.1.
2. Verify the maximum permitted filling volume that is indicated on the base and the side of the bottle as well as in Table 1.1.
3. Verify the maximum permitted number of Kayser cream chargers to be used, see base of the bottle or Table 1.1.
4. Verify the permitted ingredients, see Table 1.1. If “other foodstuffs” are also permitted, these must be available in liquid form. If such ingredients should contain solids they must first be passed through a sieve, mashed or dissolved to ensure the liquid is completely free of particles.
5. Use a measuring beaker, or other suitable measuring device, to measure the permitted filling volume.
6. Fill the measured amount into the bottle (image 2.3) taking care not to exceed the
filling mark on the side of the bottle.
7. Verify the permitted temperature range for the use and storage of the WHIPcreamer – see Table 1.1.
8. Place the device head straight on the bottle and screw it on tightly (image 2.4).
9. Insert the silver-coloured Kayser cream charger in the charger holder (image 2.5).
10. Screw the maximum permitted number of Kayser cream chargers in compliance with Section 4.3 one after the other onto the metal thread of the device head with the charger holder (image 2.6), until the gas is audibly released into the bottle. Always shake the WHIPcreamer 4 – 5 times quickly and vigorously with the charger holder screwed on every time after the gas has been released into the bottle (image 2.7).
The contents will be whipped firmer or more liquid depending on the length and intensity with which the WHIPcreamer is shaken.
11. Next unscrew the charger holder with the empty Kayser cream charger from the device head and place the dust cap on the metal thread.
12. To release the contents, the WHIPcreamer must be turned upside down so the bottle with the device head is vertical facing downwards and the lever slowly actuated (image 2.8). To enable compete release of the whipped contents actuate the lever only in this position.
13. Unscrew the decorating nozzle from the nozzle adapter after every use, wash it with warm water and the cleaning brush provided and then screw it back onto the nozzle adapter and store upright at the permitted temperature (see Table 1.1).
14. To relieve the pressure after complete release of the contents actuate the lever of the WHIPcreamer until the gas has been released completely (image 2.9). The device head can then be unscrewed easily from the bottle. Always hold the WHIPcreamer vertically with the device head facing downwards while relieving the pressure.
15. The cases of the Kayser cream chargers are made of steel. For this reason please dispose of empty Kayser cream chargers as steel scrap or crap metal in compliance with local regulations for waste disposal.
Note: The WHIPcreamer should be cleaned thoroughly before first use and always after the bottle contents have been completely removed.
1. Before opening the WHIPcreamer actuate the lever until no bottle content nor gas is discharged from the device any longer (see image 2.9).
2. Unscrew the device head from the bottle (image 2.2) and disassemble it only into the specified parts as shown in image 2.1. Slide the device piston out of the opening, unscrew the decorating nozzle and the nozzle adapter and remove the head gasket from the device head – all parts are specified in image 2.1.
3. Verify the permitted cleaning method, see Table 1.1. In the case of “hand wash” clean the parts of the WHIPcreamer with a mild washing-up liquid and the cleaning brush provided. Never use sharp objects when cleaning. Never boil, never use detergents that decompose aluminium or plastic. If the cleaning method “dishwasher” is permitted in Table 1.1, the parts of the WHIPcreamer may be cleaned in a dishwasher.
4. Once all parts are dry reassemble the device head by inserting the device piston in the designated opening, screw on the nozzle adapter and the decorating nozzle and place the head gasket into the device head – all parts are specified in image 2.1.
1. Only ever store the WHIPcreamer within the permitted temperature range (see Table 1.1) and do not expose it to direct sunlight.
2. Store the cleaned WHIPcreamer in a cool and dry place.
3. Store the WHIPcreamer and the corresponding Kayser cream chargers out of the reach of children!
1. If the device piston cannot be inserted easily into the device head during reassembling after cleaning, smooth movement can be restored by lubricating the piston gaskets with cooking oil.
2. Please contact the company Kayser should any other problems arise.
3. Check the condition of the head gasket and of the two gaskets on the piston before each use – see image 2.1. If signs of wear become visible or leakage occurs during use, these parts must be replaced. Before each use check the bottle, the device head and the thread for possible signs of wear or damage. If any such wear or damage is found, the WHIPcreamer may no longer be used.
4. If you need any spare parts or repairs, please contact the company Kayser.
5. Modifications or repairs to the WHIPcreamer and its safety devices must not be carried out by customers themselves. Any unauthorised manipulation which exceeds the instructions provided in these operating instructions can be hazardous and will void both the warranty as well as exclude our liability!
6. For repairs, always send the WHIPcreamer empty, clean and with all of its parts to the company Kayser.
1. The cream charger cannot be pierced.
- Possible cause: You are using an incorrect charger.
Troubleshooting: Only use Kayser cream chargers. Never use refill chargers.
- Possible cause: The piercing pin was damaged.
Troubleshooting: Please contact the company Kayser.
2. Gas or liquid escapes between the head and bottle when screwing in the Kayser cream charger.
Please follow the instructions in section “9. Pressure relief”. Make sure you followed the instructions in the operating instructions. Do not use any damaged spare parts.
- Possible cause: The head was not screwed on tightly enough.
Troubleshooting: Screw the head tightly onto the bottle. - Possible cause: The head gasket is missing.
Troubleshooting: Insert the head gasket into the head. - Possible cause: The head gasket is damaged.
Troubleshooting: Replace the damaged head gasket with a new head gasket. Please contact the company Kayser. - Possible cause: The bottle seal is damaged.
Troubleshooting: Please contact the company Kayser.
3. No inflow of gas is audible when screwing in the Kayser cream charger, or gas escapes between device head and charger holder when unscrewing the charger holder.
- Possible cause: The device is overfilled.
Troubleshooting: Please observe the filling mark of the device. Please follow the instructions in section “9. Pressure relief”. Make sure you followed the instructions in the operating instructions. Please follow sections 4.2, 4.5 and 4.6 for filling the device bottle.
4. The cream remains liquid and gas hisses out of the charger holder when the charger is screwed in.
- Possible cause: The charger holder was screwed in too slowly with the result that gas escaped at the side of the pin opening.
Troubleshooting: Screw the charger holder into the thread until you feel slight resistance. Then give another vigorous 3/4 turn.
5. The cream is too liquid.
- Possible cause: The WHIPcreamer has not been shaken enough.
Troubleshooting: Shake 3 times. If the cream is still liquid, shake another 3 times. - Possible cause: The cream used has too little fat content.
Troubleshooting: Give the WHIPcreamer another 3 – 4 short shakes. As a rule use cream with a higher fat content (~35%). - Possible cause: Light or UHT cream was used.
Troubleshooting: Cool light or UHT cream at least down to 6°C and shake it approximately 10 times. The WHIPcreamer must not be shaken before each further use. - Possible cause: The WHIPcreamer was not stored at the correct temperature.
Troubleshooting: Store the WHIPcreamer within the permitted temperature range (see Table 1.1).
6. The cream is too solid or crumbly.
- Possible cause: The WHIPcreamer has been shaken too much.
Troubleshooting: Check the consistency of the cream in advance and shake if too liquid. DO NOT shake before EACH use! If the contents are too solid, please let the device stand at room temperature for approx. 15 minutes and then try again. If necessary please follow the instructions in section “9. Pressure relief”. Please only use and store the device within the permitted temperature range (see Table 1.1).
7. Nothing comes out of the WHIPcreamer despite using it correctly – the device is blocked.
- Possible cause: Blockage due to liquid turning to cheese or particles that have not dissolved etc.
Troubleshooting: First follow the instructions in section “9. Pressure relief” and then the instructions in section “5. Cleaning”. Please only ever fill the device with liquids and ingredients that are free of particles! If the problem can still not be remedied, please contact the company Kayser.
8. Base of the bottle is deformed.
- Possible cause: Exceptional increase in pressure.
Troubleshooting: Immediately follow the instructions in section “9. Pressure relief” and under no circumstances continue to the use the WHIPcreamer! Please contact the company Kayser.
9. Some of the foamed contents remain in the WHIPcreamer after the gas has been emptied.
- Possible cause: The WHIPcreamer was used at an angle of 45° during emptying.
Troubleshooting: When releasing the foamed contents, always turn the WHIPcreamer upside down so the bottle with the device head is vertical and facing downwards – see image 2.8.
If the WHIPcreamer is used correctly according to the instructions, the pressure can be relieved without problem by actuating the lever. If the head cannot be easily unscrewed from the emptied device, there is the risk that the bottle is still pressurised. If this should be the case, place the WHIPcreamer upright on a level surface, cover the decorating nozzle with a cloth and actuate the lever until the pressure in the WHIPcreamer has been completely relieved. However, should the device head still be difficult to remove, please contact the company Kayser.
Every Kayser cream whipper is thoroughly inspected at the factory. For this reason, we grant a warranty of 2 years from the date of purchase, provided the device is used and operated correctly. The warranty is voided if third-party parts or chargers are used. For this reason, please keep your proof of purchase and read our operating instructions and the safety precautions carefully.
Only ever use cream chargers from Kayser.
| DEVICE | SODAsiphon STANDARD |
|---|---|
| Filling volume: | 1,0 L |
| Operating pressure (PS): | 20 bar (1,0 L) |
| Permitted temperature range: | +1 °C to 30 °C (1,0 L) |
| Suitable intended uses | |
| Household: | yes (1,0 L) |
| Commercial sector: | yes (1,0 L) |
| Permitted ingredients | water (1,0 L) |
| Cleaning | |
| Hand wash: | yes (1,0 L) |
| Dishwasher: | no (1,0 L) |
| Maximum permitted number of Kayser chargers: | 1 (1,0 L) |
| SPARE PARTS | |
|---|---|
| SPARE PARTS | |
| Charger holder: | K799 |
| Dust cap: | K735 |
| Riser pipe with the fitted gasket: | K702 |
| Measurement pipe: | K691 |
| Measurement pipe key: | K692 |
| |||||
SODAsiphon STANDARDs are pressurised containers for which particular safety precautions apply.
- Please carefully read the entire operating instructions before use.
- Store these operating instructions for future reference.
- Keep the SODAsiphon STANDARD and the corresponding Kayser soda chargers out of the reach of children!
- The SODAsiphon STANDARD is solely intended for the applications specified in these operating instructions.
- The SODAsiphon STANDARD is suitable for household use.
- Add a maximum of one litre of water to the Kayser bottle via the measuring tube. Never add other liquids or liquefied gases to the Kayser bottle. This is the only way to prevent blockages or sudden pressure increases and thus ensure safe operation of the unit.
- Never use other media than Kayser soda chargers to pressurise the SODAsiphon STANDARD.
- Use a maximum of one Kayser soda charger per complete filling – in accordance with the measuring pipe.
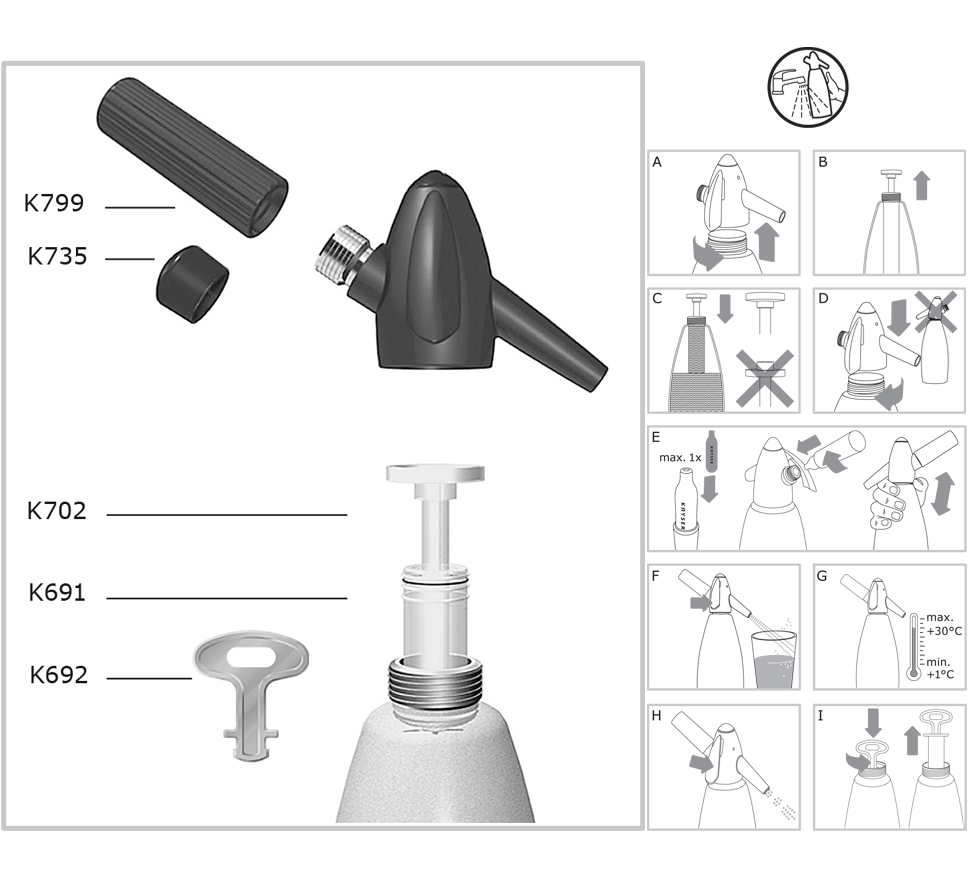
- Never disassemble the SODAsiphon STANDARD into more parts than specified (see image on page 2). Any unauthorised manipulation, which exceeds the instructions provided in these operating instructions, can be hazardous and will void both the warranty as well as exclude our liability!
- The SODAsiphon STANDARD is operated under pressure. The maximum permissible operating pressure (PS) is 20 bar. Any inappropriate use can result in personal injury.
- The incorrect operation, overfilling of the SODAsiphon STANDARD, use of more chargers than the amount specified and/or exceeding of the temperature will cause overpressure in the SODAsiphon STANDARD. The SODAsiphon STANDARD bottle is fitted with a concave safety base. In the event of an inadmissible rise in pressure, the safety base bulges partially or fully outwards, reducing the interior pressure in the bottle. In such an event, the pressure in the SODAsiphon STANDARD must be relieved immediately by actuating the lever. Under no circumstances may it be used again.
- Never force the pressurised SODAsiphon STANDARD open. When the Kayser unit head cannot be unscrewed easily, perform the following steps to relieve the pressure.
- Pressure relief:
Provided the SODAsiphon STANDARD is used correctly according to the instructions, the pressure can be relieved without problems by actuating the lever. When the Kayser unit head cannot be easily unscrewed from the emptied unit, there is a risk that the bottle is still pressurised. If this should be the case, place the SODAsiphon STANDARD upright on a level surface, cover the nozzle with a cloth and actuate the lever until the pressure in the SODAsiphon STANDARD has been relieved. However, should the Kayser unit head still be difficult to remove, please contact Kayser. - Do not expose the SODAsiphon STANDARD to temperatures below +1°C or above +30°C and avoid exposure to direct sunlight. Immediately cool and empty the product in the event of the temperature being exceeded. Stop using the SODAsiphon STANDARD if the temperature has been exceeded.
- Do not use a damaged SODAsiphon STANDARD or damaged parts.
- The SODAsiphon STANDARD may no longer be used when it is cracked or deformed.
Never drop the SODAsiphon STANDARD. A SODAsiphon STANDARD that has been dropped may no longer be used. - Only use original Kayser spare parts and components.
- Only use Kayser product components together with the corresponding components for the same type of product. The Kayser lettering is featured on the unit head, the base of the bottle and on the charger holder. The use of third-party parts is hazardous and therefore not permitted!
Intended use: The SODAsiphon STANDARD is used for the carbonising of water. Please follow the operating instructions carefully:
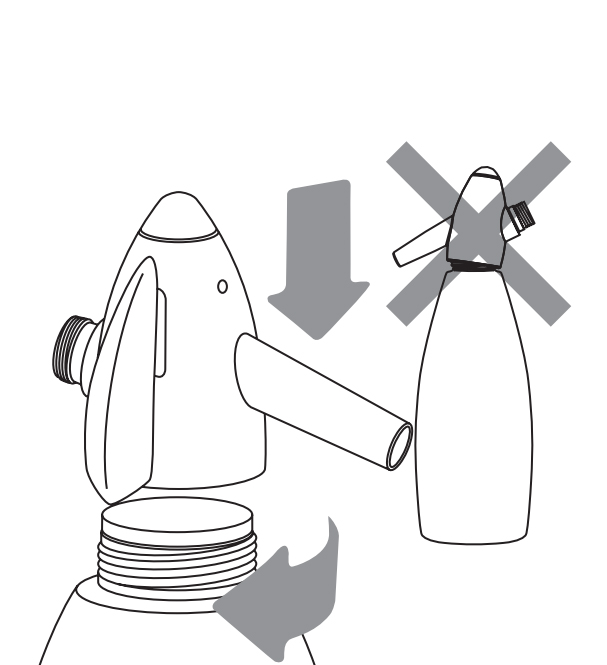
- Unscrew the Kayser unit head (image A). Clean the SODAsiphon STANDARD before its first use as described in “Cleaning”.
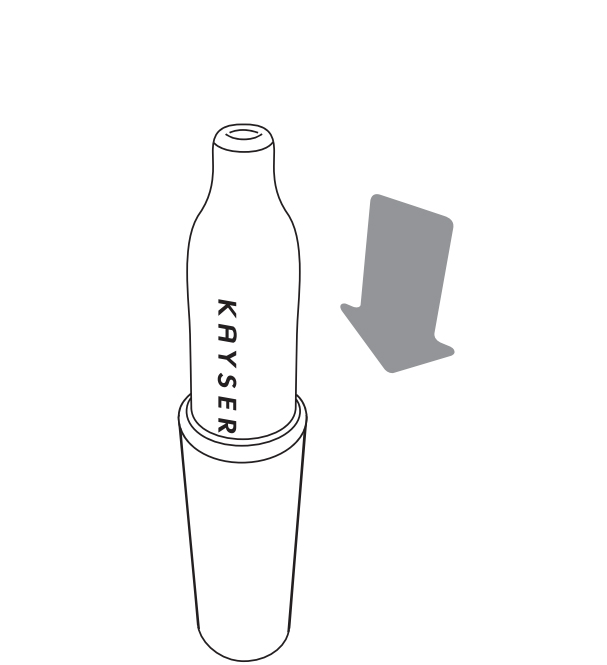
- Remove the riser pipe including the fitted gasket (K702) (image B). Check the secure fitting of the measurement pipe (K691) to avoid overfilling the SODAsiphon STANDARD. Then fill the SODAsiphon STANDARD with very cold water.
- Insert the riser pipe including the gasket (K702) through the measurement pipe (K691) into the bottle. Ensure correct placement of the gasket on the riser pipe (image C). Subsequently, place the Kayser unit head straight on the Kayser bottle and tighten it (image D).
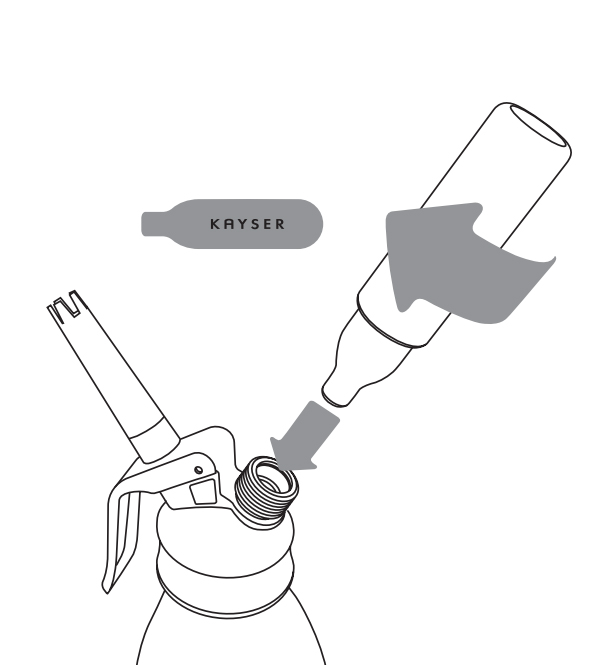
- Insert the gold-coloured Kayser soda charger in the charger holder (image E).
- Screw the Kayser charger together with the Kayser charger holder onto the metal threads, until the charger content is audibly released into the bottle. Shake the SODAsiphon STANDARD vigorously (image E) and then place it in the refrigerator. (NOT in the freezer compartment!) For best results, the colder the water and the longer it is stored in the refrigerator, the more sparkling the soda water will be. The Kayser charger holder with the Kayser charger can remain on the SODAsiphon STANDARD after the charger has been applied and the bottle was shaken.
- Actuate the lever to release the soda water (image F). Always hold the SODAsiphon STANDARD upright when using it. This ensures that no gas can escape, enabling the complete emptying of the bottle.
- Store the filled SODAsiphon STANDARD in the refrigerator (image G).
- After the contents have been completely removed, actuate the lever of the SODAsiphon STANDARD to relieve the pressure until all of the gas has been released (image H). Then the Kayser unit head can be easily unscrewed from the Kayser bottle.
- The safety regulations specified on the charger packaging apply to Kayser soda chargers.
- Kayser soda chargers are made of recyclable steel and are reclaimed as a valuable raw material in waste recycling.
- Should the carbonisation of the water be insufficient, shake it again vigorously and allow to cool for longer.
- Only store the SODAsiphon STANDARD in a refrigerator in order to chill it. Never use a deep freezer or the freezing compartment.
- Never fill the bottle without the measurement pipe inserted. The bottle is full when the inflowing water overflows from the attached measurement pipe. Do not attempt to add more water by tilting or shaking the bottle.
- Where the SODAsiphon STANDARD is not used for an extended period, it is important to rinse the bottle with warm water before reuse.
- In the event of a sticking valve, fully actuate the lever of the SODAsiphon STANDARD several times in order to make the bottle functional again.
- Please contact Kayser should other problems arise.
- Check the condition of the gaskets of the measurement pipe and riser pipe before each use. When signs of wear become visible or leakage occurs during use, these parts must be replaced. Before each use, check the bottle, the unit head and the threads for possible signs of wear or damage. If any such wear or damage is found, the SODAsiphon STANDARD may no longer be used.
- Please contact your specialist dealer or Kayser should you require spare parts or repairs.
- You may not perform modifications or repairs on the SODAsiphon STANDARD or its safety devices yourself.
- For repairs, always send the Kayser SODAsiphon STANDARD empty, clean and with all of its parts to your specialist dealer or to Kayser.
- Before opening the SODAsiphon STANDARD, actuate the lever until neither gas nor water is discharged from the bottle (see image H on page 5).
- Unscrew the Kayser unit head from the bottle (image A), remove the riser pipe (image B) and pull the measurement pipe from the bottle with the measurement pipe key (image I).
- Clean the parts of the SODAsiphon STANDARD with a mild washing-up liquid. The bottle is made of stainless steel, so never use sharp objects for cleaning. Never boil the bottle continuously in hot water. Do not use cleaning agents that could dissolve aluminium or plastic. Do not use a descaling agent. Do not clean in a dishwasher!
Each Kayser SODAsiphon STANDARD is thoroughly inspected at the factory. For this reason, we grant a warranty of two years from the date of purchase, provided the unit is used and operated correctly. The warranty is voided when third-party parts or chargers are used. For this reason, please keep your proof of purchase and read the operating instructions and the safety precautions with care.
Only ever use soda chargers from Kayser.